Definitely Not Photoshop
Jed Rembold & Fred Agbo
April 1, 2024
Announcements
Problem Sets 5 and Midterm #2 grading were posted last week
Although the majority did well, I’m considering curving the grades across by 10%
Grading of project 1 to be published soon on canvas
- It appears you’ve got some feedback already.
My version of solution to Midterm #1 exam is posted in this week module
Feeling that things are not going as expected and need to discuss?
- Please come and see me to discuss.
- From my assessment, almost everyone turning in assignments are doing okay
Project #3 ImageShop is posted and is due next week Monday 8th Apr at 10pm
Review Question
What would be the output of the printed statement in the code to the right?
- Loly black 2
- Loly, brown, 3
- Loly, black, 4
- Loly, brown, 4
class Pet:
    def __init__(self, name, color, age):
        self.name = name
        self.color="black"
        self.age = age

    def bmi(self, weight, height):
        if weight/height > 2:
            self.age = self.age*2
        else:
            self.age += 1
dog = Pet("Loly", "brown", 2)
dog.bmi(180,45)
print(f'{dog.name}, {dog.color}, {dog.age}')
Introducing ImageShop
- While you are refreshed from spring break, the next project is starting today and will be due next week Monday
- Taking a moment today to introduce Imageshop, and the guide is already posted

Starting

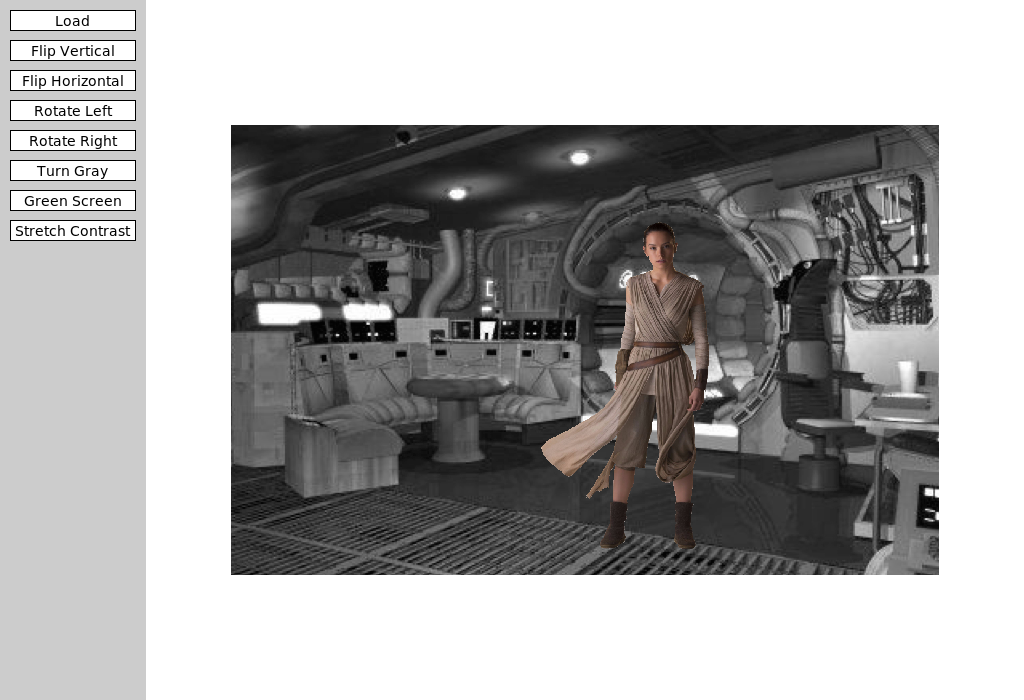
- ImageShop initially has only two buttons
- “Load” will bring up a file selection box where you can chose what
image to display
- Internally, this is handled by a function that returns the chosen file path
- “Flip Vertical” is the example feature button that flips an image vertically
- “Load” will bring up a file selection box where you can chose what
image to display
Big Picture
- Each milestone in ImageShop boils down to:
- Adding a button to the window to handle a new feature
- Writing a simple callback function that sets the new image to be equal to the output of a new function you’ll write
- Writing that function, which will return a
GImagetype object
- You are always free to write whatever other helper functions you might like!
- ImageShop is the first project to start leveraging multi-file
layouts:
- Some functions will already be provided in
GrayscaleImage.pythat you can import into your main program - You are encouraged to write the necessary functions for Milestone 5 in their own file and import them in accordingly
- To avoid scrolling madly around trying to find the code you want, this helps with that!
- Some functions will already be provided in
GButtons
- To help facilitate working with buttons, ImageShop introduces a new
type called
GButton - Each
GButtongets a label and a callback function name that determines what function is called when that button is clicked - ImageShop will come with a pre-defined
add_buttonfunction which will take care of adding a new button to the correct part of the screen.- You’ll just need to provide it a label and function name to callback to
The Current Image
- ImageShop holds the
GImagecurrently displayed on the window in a variable calledgw.current_image - The variable is specifically added as an attribute to
gwso that you will have access to it in any callback function you write - This will generally be the input to your manipulation functions, since most work with whatever image was currently displayed on the screen
- Your callback function will run
set_imageon the output of your manipulation function, which will take care of updating the value ofgw.current_image
Milestone 1
- Milestone 1 has you adding a “Flip Horizontal” button
- Add the button
- Add the action callback function
- Write a function to manipulate the pixels to flip the image horizontally
- Slightly more complicated than the example function, but not much
Milestone 2
- Here you will add buttons to rotate the image left or right (or CW or CCW if you prefer)
- Most of the difficulty comes in keeping track of rows and columns
- Need to create a new list of lists of the correct dimensions
- Need to copy over the pixels from the original to the needed location in the new list
Milestone 3
- Here you’ll add a button to convert an image to grayscale
- If you understand the other library files that have been given to you as part of the project, this project should be the simplest!
Milestone 4
- Here you get to enable a green screen effect!
- Unlike other buttons, when this one is clicked, you should use the
file chooser library to prompt the user to select another image
- This is the image that will be overlaid on whatever image is currently shown on the screen
- You will want to start with an “empty” pixel array with the same dimensions as the background
- Depending on how “green” a pixel is, you will choose between
different choices:
- If green enough, you will copy the pixel from the background image to your pixel array
- If not green enough, you will copy the pixel from the foreground image to your pixel array
Milestone 5
- Here you’ll implement one algorithm for increasing dynamic contrast across an image!
- Doing so requires several steps and different functions. It can be
convenient to place these in their own file and import them into
ImageShop.pyas needed.- Compute all the pixel luminosities
- Construct a histogram of these luminosity counts
- Your histogram should have 256 elements, one for each possible luminosity
- Construct a cumulative histogram using your histogram
- Use the cumulative histogram to adjust the luminosity of each pixel in the pixel array
- You don’t need to display the visual histograms! But they can be a
great way to check that you are doing the other parts correctly.
- Related to Problem 2 on this week’s PS
Extensions
- Give yourself time for extensions on this project!
- They are easy! Just come up with interesting or cool graphical effects and add a button for them!
- You’ll look at several this week in your section meetings
- Adding these in your project is encouraged and will be regarded as “sub-extensions”, but come up with your own as well!
Maps and Dictionaries
- A common form of information associates pairs of data values
- Commonly called a map in computer science
- Python calls such a structure a dictionary
- A dictionary associates two different values:
- A simple value called the key, which is often a string but doesn’t need to be
- A larger and more complex object called the value
- This idea of associating pairs of values is exhibited all over in
the real world
- Actual dictionaries! The words are the keys, the definitions the values.
- Web addresses! Keys are the urls, the values are the webpage contents.
Creating Dictionaries
Python dictionaries use squiggly brackets
{}to enclose their contentsCan create an empty dictionary by providing no key-value pairs:
empty_dict = {}If creating a dictionary with key-value pairs
- Keys are separated from values with a colon
: - Pairs are separated by a comma
,
generic_dict = {'Bob': 21, 0: False, 13: 'Thirteen'}- Keys are separated from values with a colon
