Tuple Records
Fred Agbo
October 26, 2026
Happy Week 10!
- No Group activity today but personal review prompts!
- We will resume group activities on Wednesday!
Quick Announcements
- We are in Chapter 10 of the reading material
- Problem set 5 is due today at 10pm!
- Project ImageShop is published today and due next
week Monday
- Again, begin to work on it from tomorrow to remain on target
- Section meeting this week will provide more useful tools on the project
- Second midterm exam is next week Friday 6th of
November.
- More details next week
Reading & Writing with PGL
- Last week we introduced reading and wrting files from the terminal
- We can make it more interactive from the GUI with the help of
pgl - This approach will be helpful in your ImageShop project
Choosing Wisely
- The Python package used to implement
pgl.pyalso supports a mechanism to choose files interactively, made available through thefilechooser.pylibrary module. filechooser.pyexports two functions:choose_input_filefor selecting a filechoose_output_filefor selecting a folder and filename to save a file to
- Both open up a file dialog that lets you select/choose a file
- Clicking Open or Save returns the full pathname of the file
- Clicking Cancel returns an empty string
- Using it thus looks something like:
filename = choose_input_file()
with open(filename) as f:
    # Code to read file
Writing to File with Filechooser
- Grab the
filechooser.pyfrom Canvas -> Modules -> Week 10 -> Additional Resources
# Ensure you import the methods from filechooser
from filechooser import choose_input_file, choose_output_file
filename= choose_output_file()
try:
    with open(filename, "a") as fh:
        fh.write("Here is a new text")
except IOError:
    print("The file location is not correct")
Review Question!
Suppose you had the file contents to the left and wanted to turn it into the contents on the right. Which code snippet below would accomplish this?
foodfooddoofwith open(file) as fh:
data = fh.read()
with open(file, 'w') as fh:
fh.write(data[::-1])with open(file) as fh:
data = fh.read()
with open(file, 'a') as fh:
fh.write(data[::-1])with open(file, 'rw') as fh:
data = fh.read()
fh.write(data[::-1])with open(file) as fh:
data = fh.read()
with open(file, 'a') as fh:
fh.write(data[-2::-1])Its a Record!
- A record is a collection of related fields treated as a single unit
- Imagine a row in a spreadsheet or database
- Or a single observation
- A record stores what the state of something was, and thus generally doesn’t change
Recording Dickens
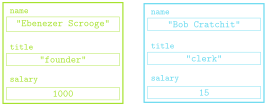
- Suppose we had some records from the two-employee firm Scrooge and Marley
- Each contains the employee name, their title, and their salary
Tuple Time
- In Python, the simplest strategy for representing a record uses the
built-in type tuple
- Comes from terms like quintuple or sextuple, that denote fixed-size collections
- An ordered, immutable sequence of values
- Feel similar to lists, except immutable, and thus used very
differently
- Think of tuples as records
- Created by enclosing a collection of elements in parentheses
employee = ("Bob Cratchit", "clerk", 15) - Stored internally similarly to a list, so each element has a corresponding index
Tuple Usage
- Can largely envision tuples as sitting between strings and lists
- Immutable, like strings
- Elements can be anything, like lists
- Common operations mimic that of strings
- Can concatenate with addition
- Can duplicate by multiplying by an integer
- Can index and slice them
- Can loop over them directly or via index
- A tuple of a single value needs a comma at the end in order to be a tuple
Tuple Selection
You can select or slice elements from a tuple just like you can with lists
- Unfortunately, records are not usually ordered in a particular way. Rather, it is the field name that is usually important
If using tuples, you can make programs more readable by using a destructuring assignment, which breaks a tuple into named components:
name, title, salary = employeeWhile modern versions of Python have such thing as a named tuple, we will not look at them here.
- The more general strategy is to define a new data type (class) to better represent the objects in question
Pointy Tuples!
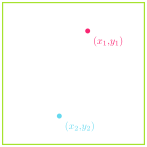
One of the most simple examples of tuple usage would be storing location information in 2d space
By storing both \(x\) and \(y\) coordinates in a tuple, it makes that information easier to store and pass around your program
When you need to use the points, best to destructure:
x,y = pt
Returning Tuples
- Tuples give us a convenient way to return multiple objects from a
function
return x, yis the same asreturn (x,y)
- Several Python built-in functions return tuples, of which a few are
particularly useful
enumeratezip
Enumerating
We have multiple ways to iterate through a string or list:
By element:
for ch in string:
    # body of loop using ch
By index:
for i in range(len(string)):
    # body of loop using i
Using
enumeratelets us get both!for i, ch in enumerate(string): # body of loop using both ch and i
Zipping
Sometimes you have multiple lists that you want to loop over in a “synced” fashion
The
zipfunction iterates through tuples of pairs of elementsFor example
zip([1,2,3], ["one", "two", "three"])would yield
(1, "one"), then(2, "two"), and then(3, "three")Can unpack or destructure as part of a
forloop:for x,y in zip([1,2,3],[4,5,6]): # body of loop using paired x and y
Demo Yarn Tuples
- Points often show up in graphical applications, where you may want to store a host of locations in a list
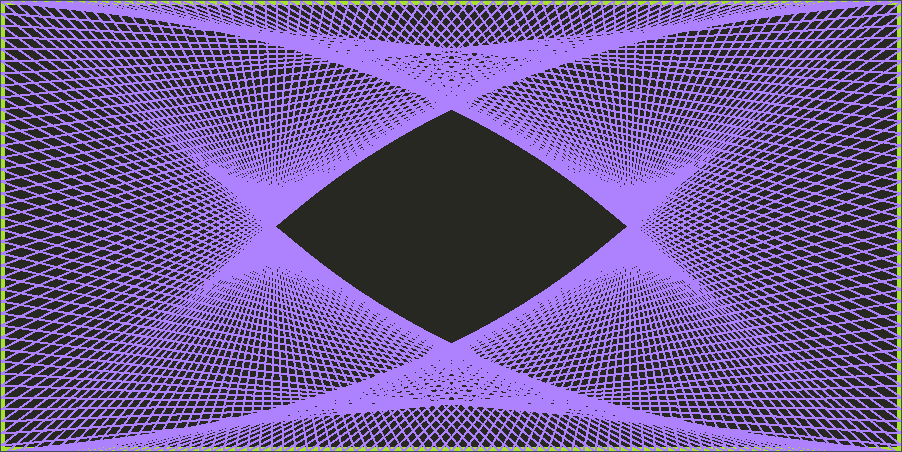
- A pretty example of points involves making some yarn art, where we:
- Place a set of “pegs” at regular intervals around a border
- Tie a piece of “yarn” around one peg
- Loop the yarn around the peg a distance
DELTAahead - Continue until we return to where we started
Expanding…
In Code
from pgl import GWindow, GLine, GRect

PEG_SEP = 3
PEG_ACROSS = 300
PEG_DOWN = 150
DELTA = 332

GWIDTH = PEG_ACROSS * PEG_SEP
GHEIGHT = PEG_DOWN * PEG_SEP

def place_pegs():
    """ Returns a list of points, where the points are tuples. """
    list_pts = []
    for i in range(PEG_ACROSS):
        list_pts.append((i * PEG_SEP, 0))
    for i in range(PEG_DOWN):
        list_pts.append((GWIDTH, i * PEG_SEP))
    for i in range(PEG_ACROSS):
        list_pts.append((GWIDTH - i * PEG_SEP, GHEIGHT))
    for i in range(PEG_DOWN):
        list_pts.append((0, GHEIGHT - i * PEG_SEP))
    return list_pts

def draw_pattern(list_pts, color='black'):
    """ Creates a window and draws in the necessary yarn. """
    gw = GWindow(GWIDTH, GHEIGHT)
    current_i = 0
    finished = False
    while not finished:
        next_i = (current_i + DELTA) % len(list_pts)
        x1, y1 = list_pts[current_i]
        x2, y2 = list_pts[next_i]
        line = GLine(x1, y1, x2, y2)
        line.set_line_width(2)
        line.set_color(color)
        gw.add(line)
        current_i = next_i
        if current_i == 0:
            finished = True

if __name__ == '__main__':
    pegs = place_pegs()
    draw_pattern(pegs, 'green')
TYK Review: Tuple Tactics
What would the code to the left print off?
246- This would error
A = (1, 2, (3, 4))
B = A[1::2]
x, y, z = A
for i in range(x):
    B += z
print(y * B[-2])
Introducing ImageShop Project!
- While you are refreshed from spring break, the next project is starting today and will be due next week Monday
- Taking a moment today to introduce Imageshop, and the guide is already posted
Starting
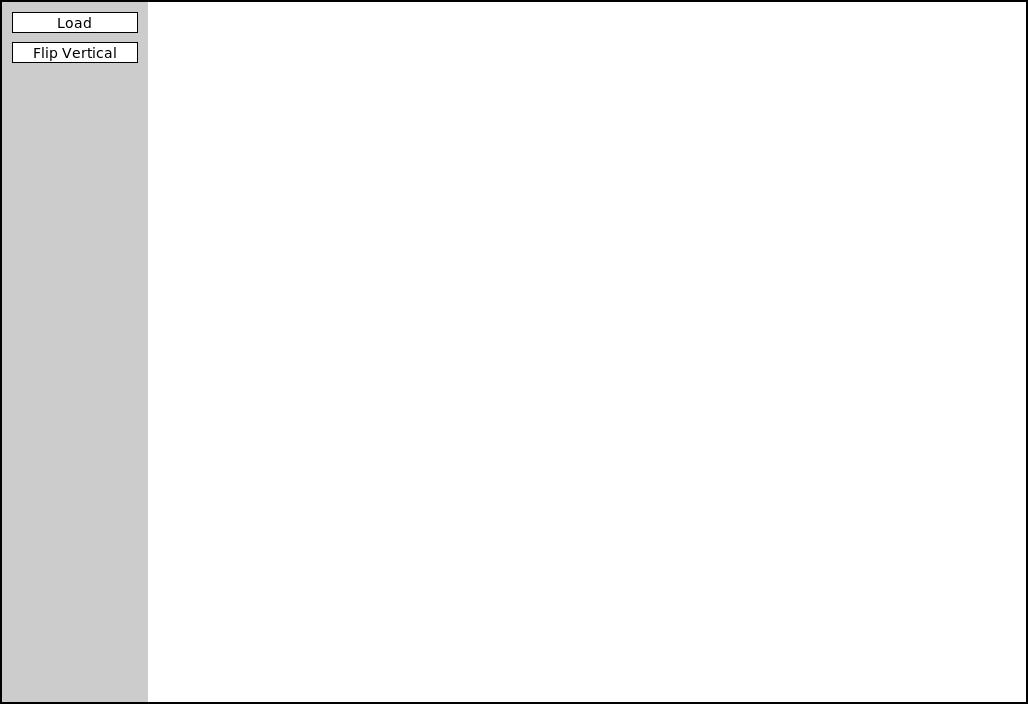
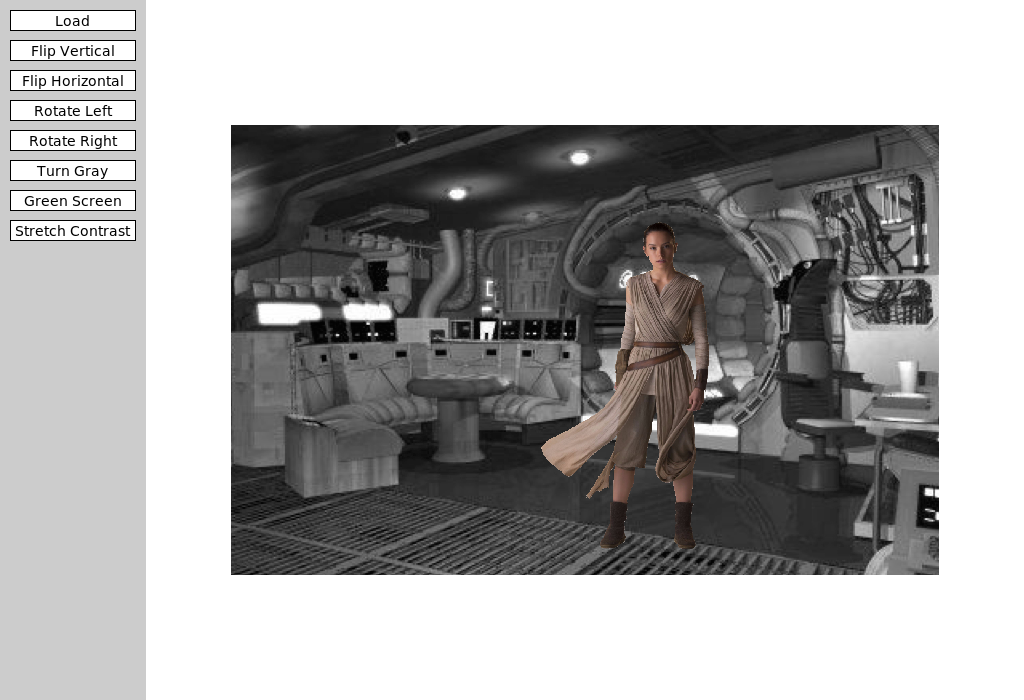
- ImageShop initially has only two buttons
- “Load” will bring up a file selection box where you can chose what
image to display
- Internally, this is handled by a function that returns the chosen file path
- “Flip Vertical” is the example feature button that flips an image vertically
- “Load” will bring up a file selection box where you can chose what
image to display
Big Picture
- Each milestone in ImageShop boils down to:
- Adding a button to the window to handle a new feature
- Writing a simple callback function that sets the new image to be equal to the output of a new function you’ll write
- Writing that function, which will return a
GImagetype object
- You are always free to write whatever other helper functions you might like!
- ImageShop is the first project to start leveraging multi-file
layouts:
- Some functions will already be provided in
GrayscaleImage.pythat you can import into your main program - You are encouraged to write the necessary functions for Milestone 5 in their own file and import them in accordingly
- To avoid scrolling madly around trying to find the code you want, this helps with that!
- Some functions will already be provided in
GButtons
- To help facilitate working with buttons, ImageShop introduces a new
type called
GButton - Each
GButtongets a label and a callback function name that determines what function is called when that button is clicked - ImageShop will come with a pre-defined
add_buttonfunction which will take care of adding a new button to the correct part of the screen.- You’ll just need to provide it a label and function name to callback to
The Current Image
- ImageShop holds the
GImagecurrently displayed on the window in a variable calledgw.current_image - The variable is specifically added as an attribute to
gwso that you will have access to it in any callback function you write - This will generally be the input to your manipulation functions, since most work with whatever image was currently displayed on the screen
- Your callback function will run
set_imageon the output of your manipulation function, which will take care of updating the value ofgw.current_image
Milestone 1
- Milestone 1 has you adding a “Flip Horizontal” button
- Add the button
- Add the action callback function
- Write a function to manipulate the pixels to flip the image horizontally
- Slightly more complicated than the example function, but not much
Milestone 2
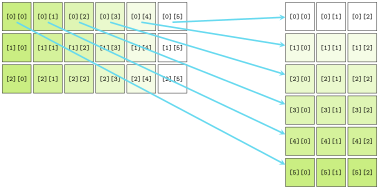
- Here you will add buttons to rotate the image left or right (or CW or CCW if you prefer)
- Most of the difficulty comes in keeping track of rows and columns
- Need to create a new list of lists of the correct dimensions
- Need to copy over the pixels from the original to the needed location in the new list
Milestone 3
- Here you’ll add a button to convert an image to grayscale
- If you understand the other library files that have been given to you as part of the project, this project should be the simplest!
Milestone 4
- Here you get to enable a green screen effect!
- Unlike other buttons, when this one is clicked, you should use the
file chooser library to prompt the user to select another image
- This is the image that will be overlaid on whatever image is currently shown on the screen
- You will want to start with an “empty” pixel array with the same dimensions as the background
- Depending on how “green” a pixel is, you will choose between
different choices:
- If green enough, you will copy the pixel from the background image to your pixel array
- If not green enough, you will copy the pixel from the foreground image to your pixel array
Milestone 5
- Here you’ll implement one algorithm for increasing dynamic contrast across an image!
- Doing so requires several steps and different functions. It can be
convenient to place these in their own file and import them into
ImageShop.pyas needed.- Compute all the pixel luminosities
- Construct a histogram of these luminosity counts
- Your histogram should have 256 elements, one for each possible luminosity
- Construct a cumulative histogram using your histogram
- Use the cumulative histogram to adjust the luminosity of each pixel in the pixel array
- You don’t need to display the visual histograms! But they can be a great way to check that you are doing the other parts correctly.
Extensions
- Give yourself time for extensions on this project!
- They are easy! Just come up with interesting or cool graphical effects and add a button for them!
- You’ll look at several this week in your section meetings
- Adding these in your project is encouraged and will be regarded as “sub-extensions”, but come up with your own as well!